

When you need to dig for a small project, using a specialized tool with your wet vac hose is one of the smartest moves you can make. It's really just a matter of connecting a specialized attachment to your wet vac and pressure washer, and you've suddenly got a precise digging tool at your disposal. This setup uses a focused jet of water to break up the soil, while a powerful vacuum immediately sucks up the mud and debris through the hose.
What you're left with is a clean, non-destructive method for all sorts of small-scale excavation jobs, from digging fence posts to safely uncovering buried pipes.
Reimagining Your Wet Vac for Precision Digging
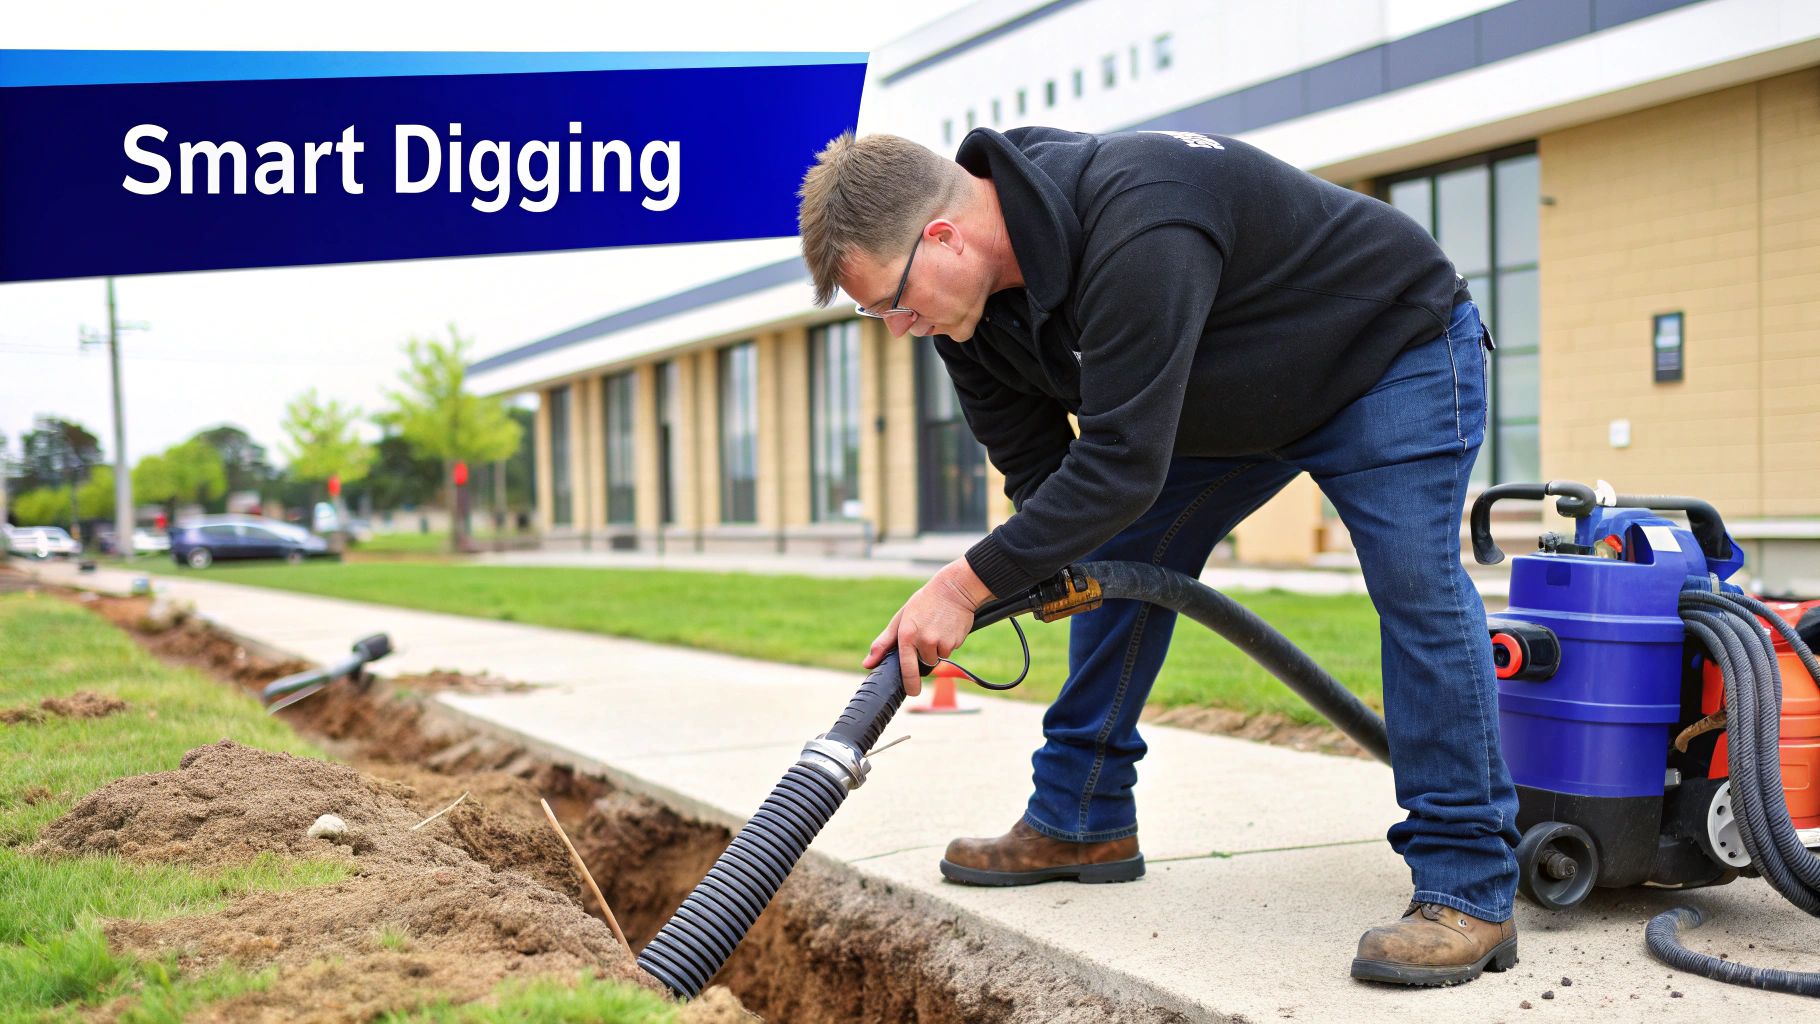
The term "gravel vacuum" might make you think of cleaning a fish tank, but in the yard care and residential digging industries, we're talking about a technique that turns two common tools—a standard wet vac and a pressure washer—into a compact, powerful hydro-excavation system.
The key to this whole operation is the Hydrovac Attachment Tool. This is not a massive hydrovac truck, but a mobile tool that pairs with a standard wet vac hose to clear small amounts of debris with incredible accuracy. For a landscaping crew needing to set a fence post right next to a sprinkler line or expose a utility cable without causing damage, this is the perfect solution.
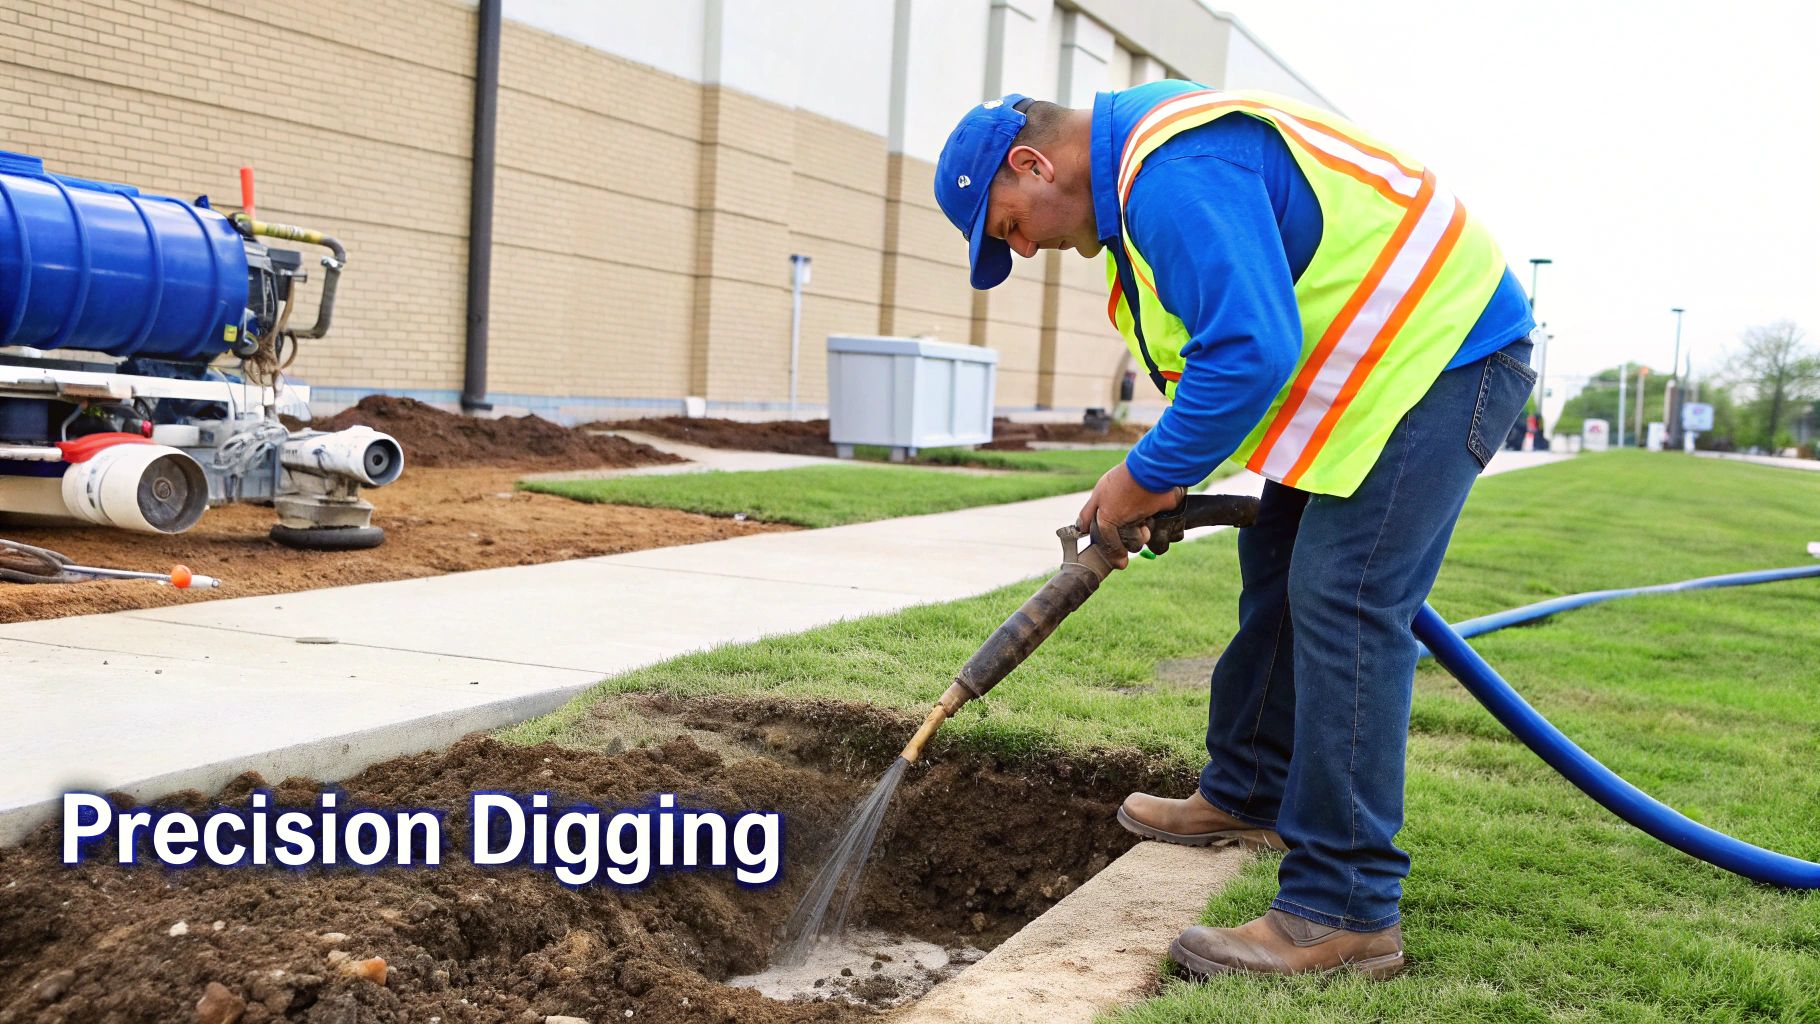
Why Ditch the Shovel for Hydro Excavation
Let's be honest, digging with a shovel in a sensitive area is a roll of the dice. Nicking a single utility line can turn a simple job into a nightmare of costly repairs and serious safety hazards. The hydrovac method practically eliminates that risk. By using pressurized water to liquefy the soil and a wet vac to clear it away, you can dig with complete confidence.
From our experience, this technique really shines for tasks like:
- Utility Daylighting: You can safely uncover pipes, cables, and conduits without even scratching them.
- Fence Post Installation: It carves out clean, perfectly sized holes for fence posts without disturbing the surrounding lawn.
- Trenching in Tight Spaces: Need a narrow trench next to a building's foundation or through a flower bed? This is how you do it without bringing in heavy machinery.
- Clearing Small Debris: It’s fantastic for cleaning out muck and gravel from valve boxes, catch basins, and other hard-to-reach spots.
The real advantage here is control. You're not just breaking ground; you're carefully washing it away. This keeps underground infrastructure intact and leaves you with a tidy worksite that’s easy to manage.
If you're digging around homes or on professional job sites, figuring out the best method is key. Here’s a quick comparison.
Comparing Digging Methods for Small-Scale Jobs
| Method | Best For | Risk of Damage | Cleanup Effort |
|---|---|---|---|
| Hydrovac Attachment | Precision tasks, digging near utilities, post holes, tight spaces. | Very Low | Minimal (slurry is contained) |
| Hand Shovel/Post Digger | Open areas with no known obstacles, basic gardening. | High (risk of striking lines) | Moderate (piles of dirt) |
| Mini-Excavator | Larger trenching, significant soil removal in accessible areas. | Very High (requires skilled operator) | High (significant ground disturbance) |
Ultimately, learning how to use a wet vac hose with the right attachment is about working smarter, not harder. It saves a ton of time, prevents expensive accidents, and delivers a professional-quality result that you just can't get with a shovel.
For a deeper dive, you can learn more about how a shop vac adapter can boost your efficiency in our related guide.
Assembling Your Hydrovac Digging Kit
Before you even think about firing up the Hydrovac Attachment Tool, let’s talk about getting your gear in order. Any seasoned pro in the yard care industry will tell you that a successful dig starts long before you break ground. It begins with a careful equipment check. Your wet vac and pressure washer are the heart and lungs of this whole operation, and if they aren't properly matched, you're in for a long, frustrating day.
First, let's look at your wet vac. When it comes to hydro excavation, forget about horsepower—that number doesn't mean much here. The stat you need to care about is CFM (Cubic Feet per Minute). CFM is all about airflow, and more airflow means more power to pull heavy mud and gravel out of the hole. For this kind of work, you’ll want a wet/dry vacuum that pulls at least 120 CFM. Anything less, and you'll struggle with heavy slurry.
Don't forget the wet vac hose, either. You’ll want a standard 2.5-inch diameter hose. It's the Goldilocks size—just right. Go any smaller, and you'll be stopping every five minutes to clear a clog. Go bigger, and you can lose the suction velocity needed to lift dense, wet material up and out.
Dialing in Your Power Source
Now for the pressure washer. The key here is finding a balance between power and precision. You need enough force to break up compacted soil, but not so much that you obliterate everything in sight. I’ve found that a unit rated between 1,500 and 3,000 PSI is the sweet spot for most residential jobs. It's got the muscle to chew through tough clay without shredding a PVC pipe or utility line if you accidentally make contact.
My Two Cents: Before I start any job, I do a quick walk-around of my equipment. I’m looking for cracks in the hoses, frayed spots, or fittings that feel a bit loose. It’s amazing how a tiny air leak in a vacuum hose can kill your suction right where you need it most.
The Pre-Dig Site Checklist
With your core equipment ready, there are just a few more things to do that separate the pros from the amateurs. These little steps are what keep a job running smoothly without constant interruptions.
- Lock Down Your Connections: Double-check that your wet vac hose is locked on tight to both the vacuum itself and the Hydrovac tool. I always use a good hose clamp to guarantee an airtight seal. You can’t afford to lose suction.
- Give Your Nozzles a Look: Take a second to make sure your pressure washer nozzle is clear. If it's even partially clogged, you'll get a weak, chaotic spray pattern that just makes a mess instead of digging effectively.
- Police the Area: Kick away any loose rocks, sticks, or other junk from your dig spot. The last thing you want is to suck up a stray piece of debris and clog the entire system two seconds into the job.
Taking five minutes to get your kit assembled the right way isn't just about prep work. It’s about setting yourself up for a clean, safe, and efficient dig. This initial effort is what prevents those common headaches like clogs and weak suction, letting you stay focused on the real work.
Getting Your Hydrovac Attachment Set Up
Alright, let's get down to business. This is where you’ll bring your three key pieces of equipment—the wet vac, the pressure washer, and the Hydrovac Attachment itself—into a single, powerful digging unit. The setup itself isn't complicated, but paying close attention to the details is what makes the difference between a frustrating dig and a clean, efficient one.
First up is the wet vac hose. Your main goal here is to get a completely airtight seal where the hose meets the attachment’s base connector. Even a tiny air leak will kill your suction power, making it a struggle to lift that heavy, wet slurry of gravel and dirt. You'll want to slide the 2.5-inch wet vac hose right over the base connector and then really crank down on the hose clamp that comes with it. Don't underestimate that clamp; it's essential for getting every ounce of suction.
With the vacuum side handled, you can turn your attention to the pressure washer. This is the "hydro" part of the equation, providing the high-pressure water jet that does the actual digging.
This diagram shows you just how simply these three common tools come together.

As you can see, the attachment is the central hub that integrates your existing equipment into a precision digging tool.
Dialing in the Connections for Maximum Power
Once you’ve got that wet vac hose clamped down tight, it’s time to connect the pressure washer wand. The nozzle cap on the Hydrovac Attachment is specifically designed to cradle the wand, aiming the water jet perfectly into the vacuum’s suction stream. Just guide the pressure washer nozzle through the opening in the cap until it feels secure. Getting this alignment right is crucial—it keeps the high-pressure spray contained, prevents messy splashback, and concentrates all that digging force right where it needs to be.
That's pretty much it. With both hoses connected, your portable hydrovac system is ready to go. You've just turned your standard job site tools into a specialized piece of equipment perfect for safely exposing pipes or digging fence post holes with surgical precision. It’s all about working smarter, not harder.
Pro Tip from the Field: When I'm working on uneven ground, I always take an extra minute to find the most level, stable spot for the wet vac. A vacuum that tips over mid-job is a huge mess and a safety hazard. If you're on a slope, always place the vacuum uphill from where you're digging so gravity is working with you, not against you.
Adapting Your Setup for Tricky Job Sites
Let's be real—the perfect, flat, open job site is a rare sight. More often than not, you’re squeezed into tight corners or working on less-than-ideal terrain. Thinking ahead during setup can save you a ton of headaches in these scenarios. For instance, if you're digging along a foundation, make sure you position your gear to give yourself plenty of room to move.
Here are a few quick adjustments I make for common challenges:
- Working in Tight Quarters: Before you connect anything, lay out your hoses to make sure there are no kinks or tight bends. You need enough slack to move the wand around freely without yanking on the pressure washer or the vac.
- Protecting Landscaping: If you’re working on a client’s pristine lawn or near garden beds, throw down a small tarp first. It protects the ground and makes your final cleanup a breeze.
- Dealing with Wind: Always check which way the wind is blowing. You want to position yourself so any overspray is carried away from you, and more importantly, away from the client's windows, siding, or vehicles.
Spending a few extra moments thinking through these site-specific details ensures your setup is not just working, but working safely and efficiently. This is how you get the most out of your portable digging system, every single time.
Getting Down to Business: Practical Digging Techniques
Alright, your gear is hooked up and ready to go. Now for the fun part. Using the Hydrovac Attachment Tool is more about finesse than brute force. The whole idea is to let the water and vacuum do the work for you, not to fight against the ground.
Your technique will change a bit from job to job, but the fundamentals are always the same. I always start with a medium water flow and keep the wand moving in a slow, circular pattern. This turns the soil into a slurry that the wet vac can suck up without a fight, which is key to preventing clogs and keeping things moving.
Digging Perfect Fence Post Holes
One of the best uses for this system is digging fence post holes without wrecking a client's lawn. An auger or post-hole digger makes a huge mess, throwing dirt everywhere and tearing up the grass. The hydrovac method, on the other hand, is like surgical excavation.
Get the tool positioned right over your mark and start spraying. The trick is to work your way down evenly, letting the water jet cut the hole while the vacuum immediately clears out the slurry.
For the cleanest holes, keep these tips in mind:
- Keep it Straight: Hold the wand as vertical as you can. A plumb hole is a happy hole.
- Spray and Pause: Give it a few seconds of water, then back off and let the vacuum do its job. This stops you from turning the hole into a mud pit.
- Define the Edges: Every so often, trace the outside edge of the hole with the water jet. This keeps the diameter consistent all the way down.
Following this approach leaves you with a perfect hole and almost zero cleanup. All the excavated dirt is contained right in your wet vac tank. On a residential digging project, that cleanliness is a massive advantage.
Safely Exposing Underground Pipes Without Damage
This is where the non-destructive nature of hydro excavation really proves its worth. We call it "daylighting"—exposing underground pipes and utilities without touching them with a hard tool. Hitting a gas line or fiber optic cable with a shovel is a mistake you only make once. It's dangerous, expensive, and completely avoidable with this method.
This level of safety is why non-destructive digging is so critical in the yard care and residential contracting industries. You can precisely dig up pipes without causing damage, a common and costly problem with traditional shovels or machinery.
When you're daylighting, the name of the game is gentle and systematic. The water pressure is enough to liquefy soil and gravel, but it won't damage PVC, conduit, or the jacketing on a cable.
Start by clearing the topsoil a few inches away from the marked utility line. Don't go straight down on top of it. Work deeper in layers, letting the water gently peel back the earth. Once you've located the utility, you can use the water jet to clean it off for inspection or repair. It’s an incredible level of control that gives both you and your client peace of mind.
For larger jobs that go beyond simple daylighting, a deeper understanding of ground conditions and safety protocols is essential, which is why some projects are best left to companies offering specialized excavation services.
Ultimately, becoming a pro with this tool comes down to managing your wand angle and water flow. Different soils will require you to adapt, and you'll even find that swapping out different water jet nozzles can make a huge difference. Mastering these little details is what separates a quick job from a professional, damage-free one.
Keeping Your Gear in Fighting Shape for the Long Haul
Any pro knows that your tools are your livelihood. When you're counting on your Hydrovac Attachment Tool, wet vac, and pressure washer to get the job done, a little upkeep goes a long way. This isn't just about good habits; it's about making sure your mobile digging system is ready to roll the second you get a call.
Like any equipment that moves a ton of material, you'll eventually run into small hiccups. A sudden drop in suction is probably the most common complaint I hear, and nine times out of ten, it’s a simple air leak in the wet vac hose or a clog. Before you even think about breaking out the tools, just give all your connections a quick once-over. Make sure that wet vac hose is clamped down tight at the base of the attachment and that the hose itself doesn't have any sneaky cracks or punctures.
Quick Fixes for Problems on the Job
Another headache that pops up is inconsistent water pressure from your power washer. More often than not, the real villain is a partially clogged nozzle. It only takes a tiny piece of grit or a bit of mineral buildup to completely throw off your spray pattern and kill your digging power. I always keep a nozzle cleaning tool in my pocket and give the tip a quick clean-out before I even start a job.
Here are a few other tricks I've learned over the years to get back to work fast:
- Weak Suction? If all your connections feel solid, the next stop is the wet vac filter. A filter that's caked with dried mud from the last job is an absolute airflow killer. A quick rinse is usually all it takes to bring it back to life.
- Stubborn Clogs: If you’ve got a blockage in the hose, shut everything down first—vacuum and pressure washer. Try to knock it loose by giving the hose a few gentle taps or carefully using a flexible rod to push it out.
- Drippy Connections: A worn-out gasket on your pressure washer hose is a classic cause of pressure-robbing drips. Keep a couple of spares in your truck; they're cheap and can save a job.
The secret is to think methodically. Always start with the easiest, most likely culprits first. I can almost guarantee that a five-minute fix, like tightening a clamp or clearing a nozzle, is all that's standing between you and a productive afternoon.
The 10-Minute Post-Job Routine
What you do after you're done for the day is just as critical as what you do on-site. Spending just ten minutes cleaning your gear can prevent corrosion, stop clogs from turning into concrete, and add years to the life of your whole rig.
Flush the entire system. Before you unhook anything, suck up a few gallons of clean water. This simple step flushes out the attachment, the hose, and the wet vac tank, clearing out any sand, gravel, or mud that’s just waiting to dry into a problem.
Inspect and wipe down the components. Disconnect the Hydrovac Attachment and give it a good rinse. I pay extra attention to the nozzle area to make sure no debris gets left behind to cause trouble tomorrow.
Empty and rinse the tank. Never, ever leave slurry sitting in your wet vac. Dump it, and give the inside of the tank a good rinse to head off any nasty smells or corrosion.
Staying on top of inspections and replacing key parts is what separates the pros from the amateurs. Keeping the heart of your pressure washer beating strong with quality parts, like reliable Graco pump replacements, ensures you always have the power you need. It also helps to really understand what makes your vacuum tick; you can learn more about vacuum suction power and air watts to get even better at diagnosing performance issues on the fly.
Got Questions About Hydrovac Attachments? Let's Dig In.
Even with the best instructions, trying out new gear on a job site always brings up a few questions. I get it. You want to be sure you're getting the most out of your tools and doing the job right. Let's tackle some of the common things professionals in the residential digging and yard care industries ask when getting started with the Hydrovac Attachment Tool.
What's the Right Setup? Pairing Your Wet Vac and Pressure Washer
Your digging system is only as good as the equipment you hook it up to. To get the best performance, you'll want to pair the Hydrovac Attachment Tool with a solid wet/dry vacuum. Look for one with at least 5 peak HP, but the most important spec is the wet vac hose diameter—it absolutely needs to be 2.5 inches. Anything smaller is just asking for clogs. A 12-16 gallon tank is usually the sweet spot, giving you enough capacity without being a pain to haul around.
As for the pressure washer, you don't need a monster machine. A unit that can push between 1500 and 3000 PSI is perfect. That's more than enough power to slice through compacted soil but not so much that you'll shred a PVC pipe or fiber optic line if you get too close.
Will This Thing Actually Cut Through Heavy Clay?
You bet it will. That's where this method really shines. Whether you're dealing with loose gravel or that dense, sticky clay that laughs at a shovel, the hydrovac approach works. The high-pressure water jet breaks up the compacted material and turns it into a movable slurry. The vacuum then immediately sucks it out of the hole through the wet vac hose. Simple as that.
Of course, if you run into rocks bigger than the 2.5-inch hose opening, you'll have to pull those out by hand. But the tool will have already cleared all the muck around them, making it a much faster and cleaner process.
Think of it this way: you're not fighting the ground anymore. You're just washing it away layer by layer. It completely changes how you approach a tough digging job, especially for fence post digging or clearing debris.
How Does This Make Digging Fence Posts Better?
For fence post digging, this is a game-changer. An auger tears up the turf and leaves a huge mess you have to clean up later. The Hydrovac Attachment Tool, on the other hand, carves out a perfectly clean and uniform hole with almost zero disturbance to the surrounding lawn.
Because all the dirt and mud get vacuumed straight into the wet vac's tank, there are no messy dirt piles to shovel up afterward. This keeps the client's property looking neat and dramatically cuts down your cleanup time. When you're working on a nicely landscaped residential property, that kind of clean execution makes a huge difference.
Is This Really Safe Around Buried Pipes?
Yes, and frankly, that's one of the biggest reasons to use it. This method is the industry standard for non-destructive digging. The water has enough force to blast away soil, but it won't slice through a gas line or puncture a water pipe.
It’s the go-to method for safely exposing underground pipes without damage—a process we call "daylighting." You're eliminating the risk and guesswork that comes with hitting something you can't see with a shovel or a machine.
Ready to make your digging jobs cleaner, safer, and a whole lot faster? The Hydrovac Attachment leverages the gear you already have on your truck to give you a powerful hydro excavation system.
Check out the Hydrovac Attachment and see what it can do for your crew.